
Contents:
Introduction
Realizing it’s not parallax mapping we are talking about
Necessary Utilities
Photoshop or GIMP?
Getting Started
Creating the ground
Create Basic Shapes
Add Details
What’s up should be up
Shadow and Light
Save Properly
Passability
Introduction
You read it all over the internet: People see parallax maps and envy those who made them. But they don’t try creating awesome maps themselves because they are either afraid it’s too hard or because they can’t find any instructions online.
Actually it’s not hard at all. In fact it’s way easier. Everything you want to have in your map, you can create. And you aren’t bound to any tilesets. And you won’t have these stupid autotile resets by placing one tile next to it after you spent so much time creating it with shift mapping.
But before we get started, let’s see if it’s really worth:
Pro:
– Awesome maps
– Awesome lighting
– Awesome mood
– No limitation to tiles
– No passability problems
– Non-Linear maps (you can shift stuff up and down so e.g. trees and houses look more natural and less aligned)
– For VX Ace users: You can finally walk behind walls without overly complicated scripts!
Contra:
– You have to learn the basics of Photoshop or Gimp
– Creating maps takes a lot longer than in the editor
So depending on what game you are creating I’d say it’s worth looking into.
DISCLAIMER: This is really text heavy, I recommend watching THIS VIDEO as you go along so you see what I’m talking about.
Realizing it’s not parallax mapping we are talking about
Let me clarify: What we will be doing here is not parallax mapping, although most commonly referred to it as such.
Parallax is the layer below “your game”, ergo just the bottommost layer of your game. With normal parallax mapping you can create stars in the background or trees passing you as you sprint through the forest.
What we are doing here is parallax+overlay mapping. This means we create everything we see, from the ground we are standing on, to the stuff above us right up to the sun shining through the clouds.
Also I have to tell you that this is no “create it in the editor and enhance it with photoshop overlays”. Here we will create everything in photoshop. This will create an asymmetric and authentic world without surrealistically straight dirt trails.
Necessary Utilities
You’ll need:
RPG Maker (duh) – Any version will do, although I’m referring to the VX Ace here.
Photoshop or GIMP (personal preference)
A script for screenshooting your map (I use Tsukihime’s “Map Screenshot”, it’s the fastest and most efficient one in my eyes)
A script for overlay mapping (I used the DasMoony Liquid&Parallax Script, but I switched to YEA Overlay Mapping. DasMoony has the ability to create animated parallaxes, which is awesome, but I had lag issues in my world map and couldn’t use the DasMoony script with encrypted files so I switched to YEA, which is still awesome because of the inbuilt light and shadow engine. But in the end it comes down to what you like most)
Photoshop or GIMP?
Of course there are many more image editing softwares out there, but these are the two most common and the two I’ve been using. Here are the advantages of each one.
GIMP
– Free
– Custom Brushes and Patterns*
Photoshop
-Layermasks (non-destructive editing)
-Layer Folders
-Nearest Neighbor**
* You can add custom brushes and patterns in Photoshop, as well, but the brushes are always grayscale and the patterns are fixed to the canvas. This is good when creating the ground (esp. solid stuff like stones and cobbles) but it’s a real issue when you want to create a forest. In GIMP you can just chose your tree1 brush and your tree1 pattern and create the tree wherever you want it to be.
** Nearest neighbor is an option you can chose when transforming images. This is actually the reason I switched to Photoshop. You can transform, enlarge and shrink anything the way you like and it still looks like a RTP tile. This comes in handy when enlarging trees, or transforming chests or moss so it fits to the walls. GIMP and most other editing tools don’t have this option anymore because it’s useless in most cases nowadays, but for “pixelart” it’s just what we need.
Getting Started!
Create a project. The pixelnumber should be the number of tiles in X and Y direction times 32 (each tile has 32 pixels).
Easier than calculating is to just create a blank map, mapshoot it and open it in your editor (I will be referring to Photoshop from now on. This should be no problem because I won’t be teaching you how to use that program, just how to create maps)
Before you start I recommend adding generic stuff like grass, stone and dirt (no this is not minecraft!) to your patterns. This will make the following way easier.
When using GIMP, you should do the same for generic windows, doors etc. When using Photoshop I recommend creating thematically arranged PSDs with all the tiles/resources you have.
Adjusting your default grid to 32×32 is helpful, too.
Creating the Ground
Chose your base layer and fill it completely with a pattern (grass, dirt etc.).
Now create additional layers and scribble around with other patterns or the same. Always play around with hue/saturation/brightness.
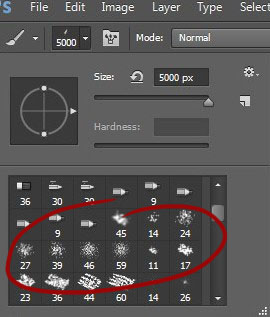
For this I recommend using one of these brushes:
It will feel really ugly in the beginning, but when you fill it with trees and structures, it will eventually look really awesome.
Take a look at the video. I even went so far as to using only 3 layers of ground, which ended up looking really patchy, but in the end it worked out quite nice.
Create basic Shapes
Now create basic structures in your RPG Maker editor. Just the walls and the roofs will suffice. Think of shapes other than just plain and lame rectangular houses. Everything that’s not just a box is exciting. You have all the possibilities here!
Take a mapshot and import them into your image editor (IEd from now on) . Adjust the shapes. You can even create several shapes and merge them in your IEd to create some depth.
A helpful tip: I like to create the basic shapes in a separate project
Add details
Now it’s time to add windows, vines, doors and so on to your houses as well plants and miscellaneous to your ground. Pay close attention to what’s underneath the player and whats above him.
Keep in mind that about 4 pixels of the head of your character will be in the tile above your current location (so either don’t bind stuff that’s supposed to be above the character to your grid).
What’s up should be up
Check if everything is where it should be. What’s above the player should be in appropriate layers.
This is especially important with trees and buildings. I recommend putting the bottom 32 pixels in a separate layer which won’t be in the top. In case you are using diagonal movement you might want to separate the bottom 48 pixels to minimize graphic bugs – but just so you know: When using diagonal movement and P-O-Mapping, you can’t completely avoid graphic bugs. (while moving diagonally the character will eventually have an edge above his head or a railing under his feet)
Shadow and Light
Now add some shadow. The shadow will be between your overlay and your ground layer. The darker the image is, the brighter the shadow will be. White parts of the image will be completely black and black parts won’t show up at all.
The light works similarly.
Save properly
In order to save a folder and to directly chose the ground layer as parallax for passability issues, I have changed the destination folder for the script to parallax. And to save time I also changed the prefixes.

The only really important thing here is that you save your parallax and overlay image as png and the light and shadow as jpg.
The first number is the map they will appear on, the second is for a switch. This way you can change the shape of a level via switches or change the night and day time. Weirdly enough in this script “ground” is the bottom layer and “parallax” is the overlay, so don’t be confused by that. (e.g. par12-1.png will be the the top layer of map 12 as long as the corresponding variable is 1 [they are 1 by default])
Passability
Now set up the ground layer (you can save the whole image as ground layer, since the top layer will be above the ground layer anyways, this way you can see your finished picture in the editor) as parallax in your actual project and check the box that says show in editor.
Now you fill up the map with invisible tiles and add different passability tiles.
Here’s how my B tile looks for this.

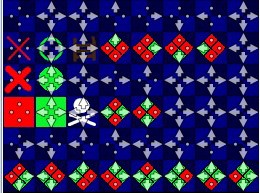
The invisible tiles above the visible ones have the same passabilities and traits. So I fill up everything and replace them with the fill bucket tool. This step is not necessary when you use the YEA script.
There you go! You created your first map!


